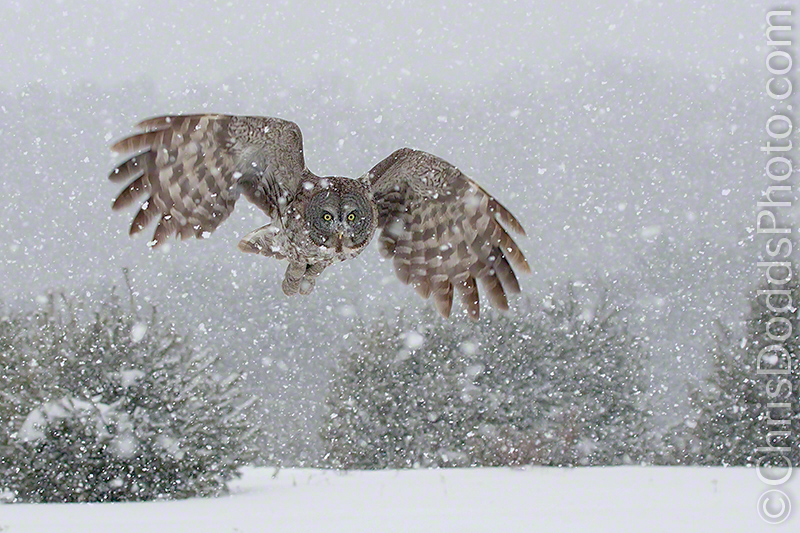
 Great Grey Owl Blizzard in White (Strix nebulosa, Chouette Lapone, GGOW) Bracebridge, Ontario, Canada. Image Copyright ©Christopher Dodds. All Rights Reserved. Canon EOS 1D Mark II, 100-400mm @ 105mm. ISO 800, F8 1/640s Manual Exposure. Full Frame. CLICK HERE TO PURCHASE A PRINT or LICENSE AN IMAGE FOR PUBLICATION.
Private Winter Owl Safari / Workshops Announced
Join Canadian Wildlife photographer Christopher Dodds for the ultimate private, or semi-private, winter owl photography trip. Our target subjects include (but are not limited to) The Snowy Owl, Boreal Owl, Great Grey Owl, Northern Hawk Owl, Barred Owl, Long-eared Owl, Short-eared Owl and the Saw-Whet Owl. Our base of operations will be near Montreal Pierre-Elliot Trudeau Airoprt (YUL) and Ottawa International Airport (YOW). Our travels could include Southern Ontario and Quebec.
Book a single day or a whole week to maximize your experience, capture multiple species in different settings and in different weather conditions (always hoping for snow). I can customize your itinerary to include the owls of Ontario and Quebec that you most want to photograph. Avoid the headache and impact of large group tours; wintering owls are often found on private property and land owners (many of them I know personally) are much more receptive to allowing just two, or three, photographers on their property, than a large workshop group. Gain access to the places I've been photographing these Northern beauties for years.
MORE INFORMATION HERE
Testimonial
I fell in love with Northern Gannets when I saw them fishing off the north coast of Florida many years ago during migration. What beautiful birds!
Researching where to see them best included Bonaventure Island in Quebec, Canada. When I saw Chris Dodds' photos I was smitten. The workshop experience was far better. Chris is a terrific person, and a great teacher. Eastern Quebec is charming and Chris knows all the folks and all the ropes to get the photographer to the best sites for shooting both on the island and on the waters surrounding the island. The birds and their behavior are unquestionably amazing to observe and record. Chris shared his strategies and shooting techniques freely. He is laid back and we who attended his photo-op had the very best time. I was pleased to have learned more about flight photography with this experience. If you have the opportunity and are interested in bird(flight) photography, this is a best experience.
Paul Herd Atlanta, Georgia, USA
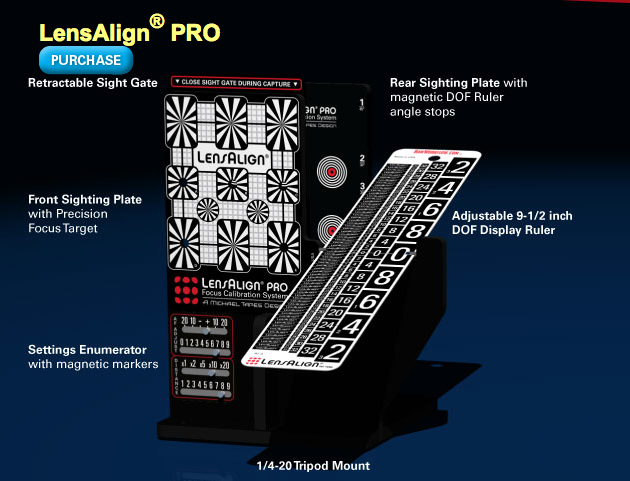
Lens Align Pro; the real secret to sharp images
My life is full of moments; some lasting longer than others. I work tirelessly at honing my craft to capture the essence of those moments; some static and some explosive, some lasting hours, others only a fraction of a second. There is no real secret to learning how to capture action; it is an acquired skill, one that can be learned, one that requires practice. Weather your subject is a static bird sitting on a pretty perch, or a Great Grey Owl flying silently through a gorgeous blanket of softly falling snow; all the practice in the world, great technique and the very best tripod and head can’t help you make sharp images if your camera’s autofocus system is not adjusted, or tuned, properly. I recently received a LensAlign Pro from Michael Tapes and was blown away when I discovered that all of my lenses needed adjustment.
There are many ways of calibrating your camera’s autofocus system available on-line; some as simple as a test chart you can print and glue to a stiff piece of card-stock, others involve moire patterns on your computer's screen. Most methods are far from scientific, and you could’t duplicate the same results twice; due mostly to the lack of a good target that is aligned parallel to the camera’s sensor, and another that can accurately allow you to see exactly where the focal plain lies and measure it’s distance from the intended target.
The LensAlign Pro is a brilliant device and the only affordable tool capable of calibrating your cameras autofocus system to the level needed to consistently and repeatably create sharp images. By first aligning the LensAlign Pro to your camera, and it’s sensor, then micro-adjusting for each lens and teleconverter in your kit, Lens Align Pro will improve your picture-taking skills and bring them to the next level of really sharp images.
PRO TIP: Be sure to remember that Canon recommends micro-adjustment calibration in the same light that you will be shooting in; that’s easy for a studio photographer, but a bit more complicated for wildlife photographers. I went through the process several times, each in different light, and noticed quite a difference between bright overcast and bright sunny conditions. I made a small business card sized printout with the different calibration settings given the light conditions and keep it in my compact flash card wallet; there was only a few differences, so it doesn't take much effort to re-configure for different light conditions.
Cameras that can be user calibrated include:
Canon 1D Mark IV, 1Ds Mark III, 1D MArk III, 5D Mark II, 7D and 50D
Nikon D3, D3X, D3S, D300, D300s, D700
Sony A900 and A850
Olympus E-30 and E-620
Pentax K20D and K7D