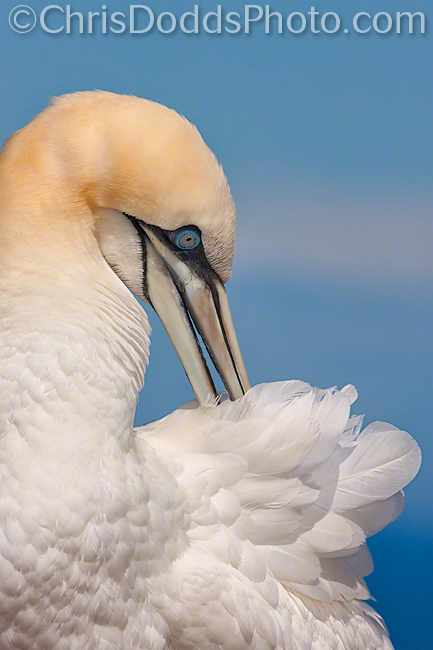
 Northern Gannets PREENING (Morus Bassanus, Fou de Bassan, NOGA) Parc national de l'Île-Bonaventure-et-du-Rocher-Percé, Bonaventure Island, Quebec. Image Copyright ©Christopher Dodds All Rights Reserved. Canon EOS 1DsMKIII, 500mm F4 L IS, Tripod & Wimberley Head II. ISO 250, F20 @1/320s Manual mode. CLICK HERE TO PURCHASE A PRINT or LICENSE IMAGE FOR PUBLICATION
Chris, I am a huge fan of your work and consider it the very best bird photography out there; bar none! I have been a photographer for 30 years, and wonder if you would share how you achieve such amazing details in the whitest feathers; the details that seem impossible for me to capture. I am always blown-away when I visit your works, and I delight in every moment on your site. Many thanks and keep up the great work - Art W.
Art, thank you for your kind words. I will try to keep my answer simple.
The key to getting the most out of your digital camera is exposing the image correctly, as you probably know. I expose “to the right”, but make a huge effort not to have any data touching the right side of the histogram.
With only a little experience, a quick glance at the histogram can tell you if the exposure is correct, and give you and idea of the general appearance of the image; are the highlights blown? Is there enough shadow detail? – It’s all in the histogram.
The histogram is a tool available on most digital cameras. It is a graph, which maps the luminosity (or brightness) values of your image, from black at left to white at right. The number of pixels at any given value are represented by the height of that value’s column. Once accustomed to reviewing the histogram, analyzing the data contained in it becomes second nature. It is the only way to know if you have exposed your image properly.
I’ll save you the boring science and details, but the idea of exposing to the right is a theory that capitalizes on the fact that the right side of the histogram contains more data than the left; there is more data in the whites, than in the blacks – much more. By overexposing the image slightly, and adjusting its brightness (or exposure) while converting the RAW image after capture, there is more data or details in the image. Conversely, if you were to underexpose an image and try to brighten the image after capture, then you would introduce noise, rather than detail, which was not captured in your RAW file. You have to be very careful not to push the whites up against the right of the histogram, or you risk loosing detail.
A good workflow post capture is another critical key to maximizing any detail contained in the RAW image. I typically use Photoshop to adjust contrast, boost saturation and add a little sharpness. My master .tiff is not created until I use Nik Software's Viveza 2. Viveza 2 is powerful engine that (among other things) adds targeted tonal contrast to any whites via the structure slider – be careful, it’s easy to overdo the adjustment.
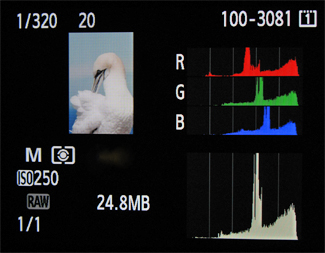
Image of Histogram of the PROPERLY EXPOSED image above on the camera's LCD screen - The data is to the right of the histogram, but does not show any sign of over-exposure; there is no data touching the right edge of the graph.
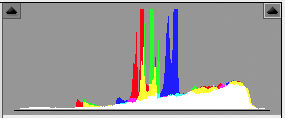
Histogram of the same image when opened in Adobe Camera Raw for conversion without any adjustments.