 Harlequin Toad (Atelopus limosus). Provincia de Colón, Panama. Image Copyright ©Christopher Dodds www.chrisdoddsphoto.com All Rights Reserved. Canon EOS 1DsMKIII, Sigma 150mm F2.8 Macro, Wimberley F2 Macro Flash Bracket, Canon 580 EX II Flash with LumiQuest Softbox III Hand-held. ISO 400, F16 @ 1/160s Manual mode. Full Frame. CLICK HERE TO ORDER A PRINT OR TO LICENSE IMAGE FOR PUBLICATION.
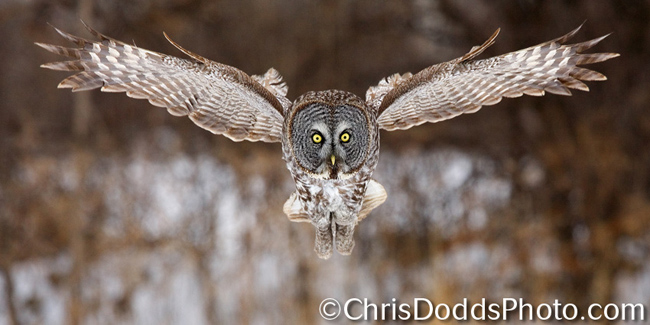
Panama: Home safe
Just home from an incredible nature photography trip to Panama. By far, the most fun, rewarding and adventurous part was spending days deep in the jungle photographing highly endangered relatives of the, now extinct in the wild, Panamanian Golden Frog (Atelopus zeteki). Crawling around jungle streams after hiking through the jungle had me facing some of the very toughest tropical conditions. I was constantly soaking wet from sweat, and I could feel my own body heat reflect back onto my face each time I brought the camera to my eye to take a picture; only to have the viewfinder and my glasses constantly fog-up. There was simply no escape from the heat and humidity. I chose to bring my Canon EOS 1Ds Mark III as my primary camera body and my Canon EOS 5D Mark II as my back-up; both performed flawlessly in the very toughest of conditions. I was, however, disappointed to have my Canon 580 EX II Flash fail yet again.
I have only had conjunctivitis once before, but quickly realized it's symptoms appearing on the third morning. Facing a medical situation involving my eyes in a third world country was a somewhat worrisome task; I was afraid that the medicine would do more harm than good. Turns out that my worries were unfounded and I was able to get American made medicine over the counter at a large pharmacy chain. The infection started to clear within 24 hours and all is fine now.
Enduring mosquitoes, tick and chigger bites and an ant attack were all well worth it (yes, I did use precaution), and a visit to Dr. Rashed at the Tropical Disease Centre of the Montreal General Hospital upon my return to have the various bites, blisters, welts, marks and rashes checked-out seems to have given me a clean bill of health (though I'm still waiting for the results of the three ticks that I removed from myself after my return home). Oh, the glorious & romantic life of a nature photographer (smile).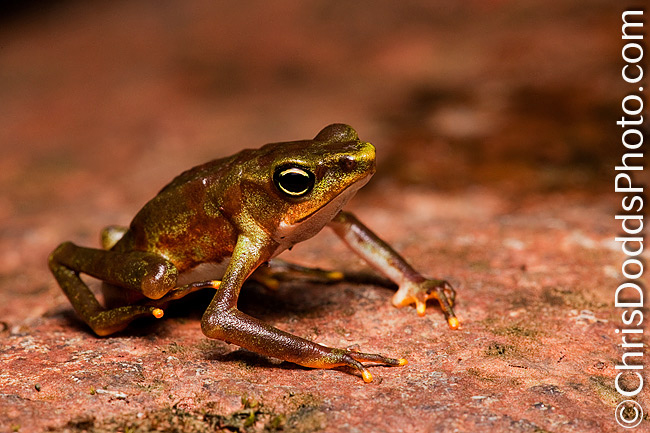 Harlequin Toad (Atelopus limosus). Provincia de Colón, Panama. Image Copyright ©Christopher Dodds www.chrisdoddsphoto.com All Rights Reserved. Canon EOS 1DsMKIII, Sigma 150mm F2.8 Macro, Wimberley F2 Macro Flash Bracket, Canon 580 EX II Flash with LumiQuest Softbox III Hand-held. ISO 640, F16 @ 1/125s Manual mode. Full Frame. CLICK HERE TO PURCHASE A PRINT OR LICENSE AN IMAGE FOR PUBLICATION.
“Ground Beef”
After arriving in Panama City and collecting luggage, rental car and picking-up granola bars and bottles of water, I stopped for a bite at the international fast food chain symbolized by the golden arches. While waiting an unusually long time for my meal, I watched the woman at the grill drop a hamburger patty on the floor, pick it up with her spatula and replace it on the grill; I guess she thought it would sterilize it by putting it back on the heat (smile). I have always heard the rumors that there was no beef in their burgers; but now know it is, in fact, GROUND BEEF! She took a quick look around while laughing with her colleagues in the kitchen until she made eye contact with me and realized that she had been seen - then she quickly looked away and resumed making burgers. I simply walked away and decided I could wait until breakfast to eat. 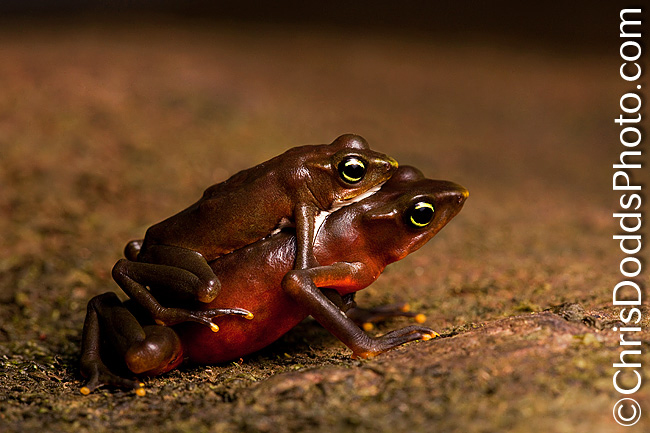 Harlequin Toads Amplectant Pair (Atelopus limosus). Provincia de Colón, Panama. Image Copyright ©Christopher Dodds www.chrisdoddsphoto.com All Rights Reserved. Canon EOS 5D mark II, Sigma 150mm F2.8 Macro, Wimberley F2 Macro Flash Bracket, Canon 580 EX II Flash with LumiQuest Softbox III Hand-held. ISO 800, F14 @ 1/160s Manual mode. Full Frame. CLICK HERE TO ORDER A PRINT OR LICENSE IMAGE FOR PUBLICATION.
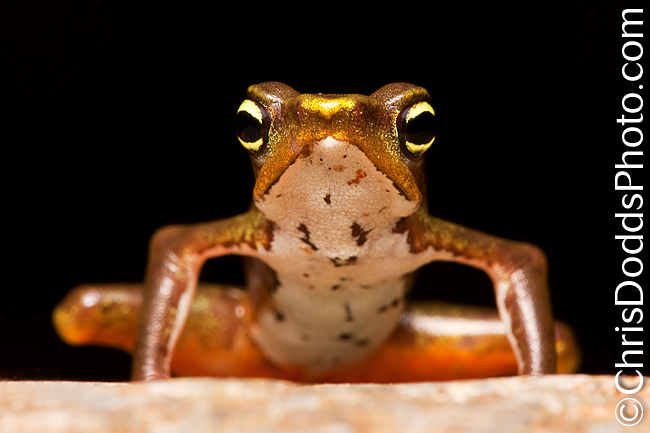
Harlequin Toads (Atelopus limosus) & amphibian chytrid fungus (Batrachochytrium dendrobatidis)
amphibian chytrid fungus (Batrachochytrium dendrobatidis) is a lethal fungus spreading across Central America and wiping out entire populations of frogs. The Batrachochytrium dendrobatidis is so deadly that it kills about half of all amphibian species and reduces overall populations by about 80% after it’s arrival in any given place. One third of the known 5,743 amphibian species in the world are at risk of being wiped out! On a world scale, 122 species of amphibian species have gone extinct, compared with five bird species and no mammals in the same period.
Listed by the IUCN (Red List) as endangered, the Harlequin Toad (Atelopus limosus) is also known as the Mossy Stub-footed Toad and Limosa Stubfoot Toad. An endemic species of Panama, it’s population is limited to 5,000 square kilometer range of severely fragmented forest and is at risk from Amphibian Chytrid Fungus and habitat loss.
Apple Announces Aperture 3 - FINALLY
Funny how critics blasted Apple for not announcing a new version of Aperture when Adobe released it's free beta version of Lightroom 3. I'm happy to report that Apple just released it's newest full version of Aperture. Unlike Adobe, Apple waited to release a full, working version available as an upgrade for only CAD$109.00. This new version has more than 200 new features, including the incorporation of Faces and Places from iPhoto. Apple included brushes, pre-sets and advanced slideshows with full multimedia support. If you're a Mac user, be sure to try the 30 day free trial here. If you're a PC user, then is is just another reason to make the switch to Apple (smile). I've only had limited time with Aperture 3, but kudos to Apple for waiting to offer a full version and skipping the "use your customer base as guinea-pigs" stage. Though, perhaps, early to offer a full review, my experience has been flawless so far.
Thanks for your concern
My last post was on January 22, 2010, so this is the longest I've gone without blogging. Many thanks to the many dozens of folks who emailed me to check-in and see if all was A-OK. As you can see, I was having a blast in Central America!
"Hi Chris- nice shots. I don't mean to be a purist snob, but one major concern- you can't wear insect repellent and work with amphibians- *especially* critically endangered ones. 95% of the time, they'll die with exposure - either direct touch on the mucous membrane (skin), gasseous, or otherwise."
- Joe Milmo (via Facebook)
Hi Joe,
Thank-you! Excellent points. It is also strongly recommended to wash hands frequently (or wear powder-free Nitrile gloves) and disinfect footwear (using bleach mixed with water) to stop the spread of amphibian chytrid fungus.
Very best,
Chris


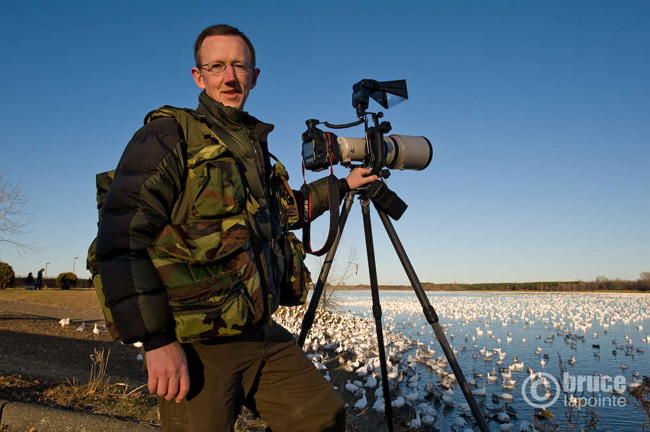 That's me, Christopher Dodds, with my Vested Interest Khumbu Photo Vest. Notice just how many pockets there are and that it fits over my down winter jacket. Image copyright & courtesy of Bruce Lapointe.