Jobu Designs Canon 1DX L-Bracket announced

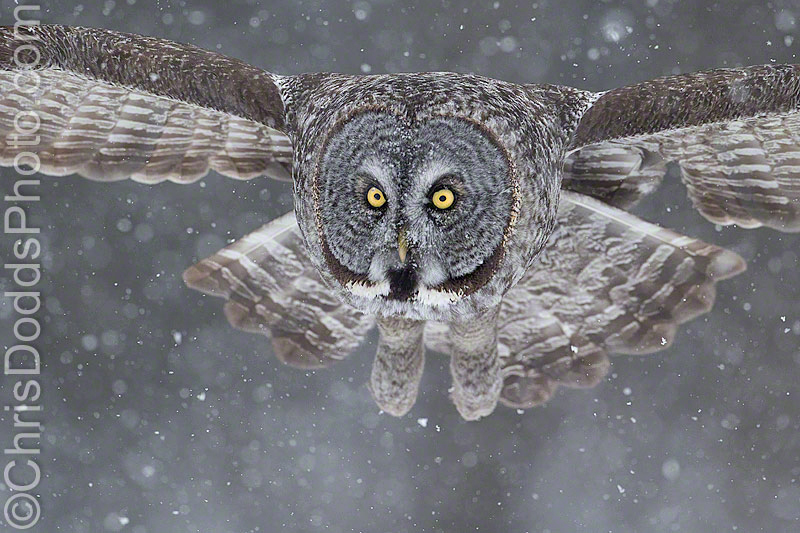
Great Grey Owl TWO STEP (Strix nebulosa, Chouette Lapone, GGOW) Gatineau, Quebec ©Christopher Dodds All Rights Reserved. Canon EOS Canon EOS 1DX, 500mm F4 L IS, Tripod & Jobu Jr. 3 ISO 2,500s, f/4 @ 1/2,500s Manual mode. Click HERE to order a print or license image for publication.

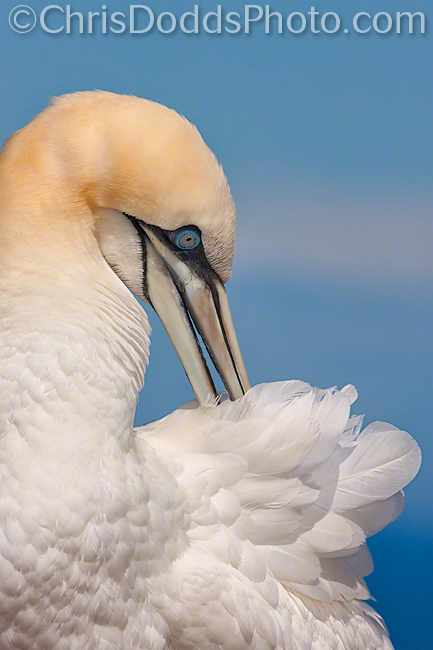
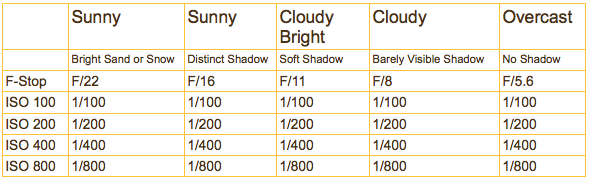
Well, I've lost track of time and think I'm about to leave for week number six or seven of my winter Snowy Owl photographic workshop safaris. Here's one from last week during an epic shoot in a field of fresh snow. Do note the exposure used reflects that is was cloudy and almost dark - Read more about Sunny 16 Rule from a prior blog enty.

New Jobu Designs 1DX L-Bracket

 
Jobu Designs has come up with a unique way of solving the mounting problems with the Pro size Canon camera bodies. The LB-C1DX is a two-piece L bracket with unique side-plate that only contours to the back of the camera, leaving lots of room out front for access to the battery and rubber covers. They have also integrated a unique magnetically captured hex wrench in the base plate. The tiny magnet will hold several pounds of steel, so the hex wrench is securely attached without rattling, yet it is still easy to remove. Shoot in portrait or landscape, or remove the side-arm easily and use just the base-plate if you want to save weight and space in your backpack. Proudly made of solid aircraft grade aluminum in Canada, it is compatible with most Arca-Swiss type clamps.


SAVE 15% OFF your purchase at the JOBU store and support this site just by using the coupon code "NATURE" at the Jobu website store checkout HERE.


Le Nichoir Photo Geek Christmas Party Fundraiser

BUY TICKETS ONLINE HERE

Join me, Canadian nature photographer Christopher Dodds, on March 9, 2013 at 6:30 PM at the Casgrain Theatre (CEGEP John Abbot College 21275 Lakeshore Road, Sainte-Anne-de-Bellevue, Québec H9X 3L9, Canada) for an hour and a half long slideshow presentation to benefit Le Nichoir. The show is designed to be entertaining and informative to all; nature lovers and photographers alike. Stories of adventure, natural history facts and information are all on the menu and this show is designed to offer helpful tips & techniques sure to improve your photography efforts with everything from a camera phone, point & shoot camera or professional SLR camera system. Over one hundred of his images will be projected, many unseen.  Everyone is welcome!
Hurry! Only 280 seats. Tickets are only $18.00 each and are available for advance purchase only - every penny is collected by, and goes to Le Nichoir. Please call or email Le Nichoir (communication@lenichoir.org 450-458-2809) to secure your tickets, or make a donation if you can't make it (be sure to tell them it's on behalf of Chris' Photo Geek Christmas Party) Major credit cards and cheques accepted. There will be ample time to mingle, meet my friends and contacts and share some of your images with others, so feel free to bring prints, iPads or laptops with your favourite images to share. I hope to see you there and PLEASE SPREAD THE WORD!

The door prizes were over the top last year, and thanks to my good friends and sponsors, we have secured an even better stash for this year.

If you would like to contribute door prizes for, or sponsor, this worthy cause, please email me (chris@chrisdoddsphoto.com) to discuss. It's a great way to have your product or brand mentioned in every blog post until the main event while helping an awesome cause!

Last year we raised over $2,500.00 and I am asking for your help to at least double that!

Great Grey Owl CLOUDY BRIGHT EXPOSURE MAGIC

Great Grey Owl CLOSE ENOUGH? (Strix nebulosa, Chouette Lapone, GGOW) Ottawa, Ontario ©Christopher Dodds All Rights Reserved. Canon EOS Canon EOS 1DX, 500mm F4 L IS, Tripod & Jobu Jr. 3 ISO 2,500, f/5.6 @ 1/2,500s Manual mode. Click HERE to order a print or license image for publication.

Snowy Winter Owl Workshops/safaris

I am having amazing times with my Snowy Winter Owl Workshops Safaris. Some amazing opportunities with Great Grey Owls this year! I have only two spots left from February 25 to March 1 this year, with only limited space left for next winter. Check it out HERE!

Cloudy bright f/5.6 rule

This is not magic - it's science! It is amazing to realize how few people have heard of the sunny 16 rule; some actually know the rule for sunny conditions, but few know what to do when it's not sunny. This is an easy way to set the correct exposure without even thinking about it with no meter and no fumbling! In cloudy conditions (when you no longer see your shadow), simply set your camera to f/5.6 and the shutter speed to the nearest to the reciprocal of the film speed (or an equivalent exposure). Take a look at the camera settings I chose for the image above, and see I used f/5.6, ISO 2,500 and 1/2,500s. Check-out my earlier post about the Sunny 16 Rule to get a better understanding and impress your photo buddies.

Canon 1DX Firmware update

Firmware Version 1.2.1 for the EOS-1D X incorporates the following improvements and fixes:

  • The function to disable the Image size selection button has been added.
  • Fixes a phenomenon in which Err 70 and Err 80 may occur in very rare instances depending on the camera settings or shooting scene.

To download the latest firmware, visit Canon Canada EOS 1DX Driver page

Photo Geek Christmas Party in MARCH!

BUY TICKETS ONLINE HERE

Please do book your tickets soon to avoid disappointment.

Join me, Canadian nature photographer Christopher Dodds, on March 9, 2013 at 6:30 PM at the Casgrain Theatre (CEGEP John Abbot College 21275 Lakeshore Road, Sainte-Anne-de-Bellevue, Québec H9X 3L9, Canada) for an hour and a half long slideshow presentation to benefit Le Nichoire. The show is designed to be entertaining and informative to all; nature lovers and photographers alike. Stories of adventure, natural history facts and information are all on the menu and this show is designed to offer helpful tips & techniques sure to improve your photography efforts with everything from a camera phone, point & shoot camera or professional SLR camera system. Over one hundred of his images will be projected, many unseen.  Everyone is welcome!
Hurry! Only 280 seats. Tickets are only $18.00 each and are available for advance purchase only - every penny is collected by, and goes to Le Nichoir. Please call or email Le Nichoir (communication@lenichoir.org 450-458-2809) to secure your tickets, or make a donation if you can't make it (be sure to tell them it's on behalf of Chris' Photo Geek Christmas Party) Major credit cards and cheques accepted. There will be ample time to mingle, meet my friends and contacts and share some of your images with others, so feel free to bring prints, iPads or laptops with your favourite images to share. I hope to see you there and PLEASE SPREAD THE WORD!

The door prizes were over the top last year, and thanks to my good friends and sponsors, we have secured an even better stash for this year.

If you would like to contribute door prizes for, or sponsor, this worthy cause, please email me (chris@chrisdoddsphoto.com) to discuss. It's a great way to have your product or brand mentioned in every blog post until the main event while helping an awesome cause!

Last year we raised over $2,500.00 and I am asking for your help to at least double that!

Histogram, Details and Viveza 2.0

Northern Gannets PREENING (Morus Bassanus, Fou de Bassan, NOGA) Parc national de l'Île-Bonaventure-et-du-Rocher-Percé, Bonaventure Island, Quebec. Image Copyright ©Christopher Dodds All Rights Reserved. Canon EOS 1DsMKIII, 500mm F4 L IS,  Tripod & Wimberley Head II. ISO 250, F20 @1/320s Manual mode. CLICK HERE TO PURCHASE A PRINT or LICENSE IMAGE FOR PUBLICATION

Chris, I am a huge fan of your work and consider it the very best bird photography out there; bar none! I have been a photographer for 30 years, and wonder if you would share how you achieve such amazing details in the whitest feathers; the details that seem impossible for me to capture. I am always blown-away when I visit your works, and I delight in every moment on your site. Many thanks and keep up the great work - Art W.

Art, thank you for your kind words. I will try to keep my answer simple.

The key to getting the most out of your digital camera is exposing the image correctly, as you probably know. I expose “to the right”, but make a huge effort not to have any data touching the right side of the histogram.

With only a little experience, a quick glance at the histogram can tell you if the exposure is correct, and give you and idea of the general appearance of the image; are the highlights blown? Is there enough shadow detail? – It’s all in the histogram.

 The histogram is a tool available on most digital cameras. It is a graph, which maps the luminosity (or brightness) values of your image, from black at left to white at right. The number of pixels at any given value are represented by the height of that value’s column. Once accustomed to reviewing the histogram, analyzing the data contained in it becomes second nature. It is the only way to know if you have exposed your image properly.

I’ll save you the boring science and details, but the idea of exposing to the right is a theory that capitalizes on the fact that the right side of the histogram contains more data than the left; there is more data in the whites, than in the blacks – much more. By overexposing the image slightly, and adjusting its brightness (or exposure) while converting the RAW image after capture, there is more data or details in the image. Conversely, if you were to underexpose an image and try to brighten the image after capture, then you would introduce noise, rather than detail, which was not captured in your RAW file. You have to be very careful not to push the whites up against the right of the histogram, or you risk loosing detail.

A good workflow post capture is another critical key to maximizing any detail contained in the RAW image. I typically use Photoshop to adjust contrast, boost saturation and add a little sharpness. My master .tiff is not created until I use Nik Software's Viveza 2. Viveza 2 is powerful engine that (among other things) adds targeted tonal contrast to any whites via the structure slider – be careful, it’s easy to overdo the adjustment.


Image of Histogram of the PROPERLY EXPOSED image above on the camera's LCD screen - The data is to the right of the histogram, but does not show any sign of over-exposure; there is no data touching the right edge of the graph. 


Histogram of the same image when opened in Adobe Camera Raw for conversion without any adjustments.


The Fundamentals of Photography: Understanding the Light Meter

Siberian (Amur) Tiger Portrait Panthera tigris altaica (Tigre de L'Amour ou Tigre de Sibérie). CAPTIVE ANIMAL. Image Copyright ©Christopher Dodds  www.chrisdoddsphoto.com All Rights Reserved. Canon EOS 1DsMKIII, 500mm F4 IS, 2X II Tele-converter Gitzo 1325 Tripod with Wimberley Head II. ISO 800, F8 @ 1/160s Manual mode. Ambient exposure using hand-held Sekonic L-358 Light Meter. Full Frame. CLICK HERE TO PURCHASE A PRINT or LICENSE IMAGE FOR PUBLICATION.

The in-Camera Light Meter:

Pretty much all digital cameras sold today include a built-in REFLECTIVE light meter. The volume of light measured by a reflective light meter varies relative to the color (or reflectance) of the subject, the background (and the subjects distance from it) and the chosen metering mode (or pattern); A Snowy Owl in a bright, snowy field reflects more light than a black bear on a dark, wet rock. Think of it this way: pure white reflects nearly all of the light that strikes it, and pure black reflects virtually none of the light that strikes it.
Left to it’s own devises, a digital camera in one of it’s automatic modes (Program, Aperture Priority or Shutter Priority) will use it’s built-in computer  processor and programmed algorithms to determine the appropriate exposure settings such as shutter speed, f-stop (or aperture) and ISO to render the scene at what it thinks should be 18% grey, or a mid-tone (exactly mid way between the blackest black and the whitest white). The problem is a simple one; most cameras assume that everything they photograph reflects 18% of the light that falls onto them. Not everything we see or photograph is a mid-tone; with this method, we need to compensate to achieve the correct exposure for anything that is not a mid-tone; The Snowy Owl in a Snowy field we talked about earlier would be about two stops under-exposed, so we need to add about two stops of light to the metered reading to achieve the correct exposure. The black bear on the dark, wet rock will be about two stops overexposed, so we have to remove about two stops of light from the metered reading to achieve the correct exposure. A picture of the green grass on your front lawn is a middle tone and requires no compensation to achieve the correct exposure.
The problem gets much bigger when your subject starts to move from one colored background to another, or, moves closer or further away; can you imagine dialing in the correct exposure compensation, on the fly, as a white bird flies from a blue sky background to a dark cliff face background as it gets bigger in the frame while flying toward you? (smile) ... I didn’t think so.

Hand-held Light Meter:

The single best teaching aid that I know of is a hand-held light meter; students wanting to learn exposure theory tend to improve the exposure accuracy of their captures almost instantly when handed a hand-held light meter.
In it’s simplest form, a light meter measures light;  We’ve discussed how your camera uses it’s meter to measure the light that is reflected from your subject, now let’s talk about how to measure the ambient light that falls onto your subject by using a hand-held light meter. If we can measure the AMBIENT light that falls onto the subject, we can successfully expose for the light (not the subject), and capture colors and tones as our eyes see them; white looks white, black looks black and middle tones still look like middle tones; just the same as our eyes see them. As long as you are in the same light as your subject, and the volume of light does not change between measurement and capture, you can take a reading and lock and load the chosen ISO, F-stop and shutter speed. Just like the sunny F/16 rule in my last post, you should still use your camera’s histogram to tweak the exact exposure to taste, and you should expose to the right and maximize that right most fifth of the histogram, as it contains 50% of the data in a digital capture. I typically add light to extract maximum detail from very dark subjects and remove light from very bright subjects, all the while ensuring I’m not clipping unrecoverable highlight detail.
On a clear day, from two hours after sunrise, until two hours before sunset, the light remains constant (provided it doesn't get cloudy, of course). If your subject flies from the blue sky to a dark cliff face, there is no need to make adjustments to your chosen exposure settings; the subject will be correctly exposed in manual mode.

A major difference between the old film days and digital is that instead of exposing for shadow detail on film, we now expose for the highlight. To ensure a correct exposure for the highlights, simply turn the meter’s dome toward the light source. To take a reading for the underside of a bird flying over your head, turn the dome toward the ground and to establish the correct reading for  a subject in the shade, point the dome toward the light source and use your hand to shade the dome. It won’t take long to learn all about light, it’s volume and the correct exposure relative to it.

There are many light meters to choose from, but I find the best value to be the Sekonic L-358 Flash Master Light Meter

Basic Exposure Theory: The Sunny F/16 Rule Explained

Snowy Owl Bubo scandiacus (Harfang des neiges) Casselman, Ontario. Image Copyright ©Christopher Dodds  www.chrisdoddsphoto.com All Rights Reserved. Canon EOS 1DsMKII, 500mm F4 IS ISO 400, F5.6 1/1600s Manual mode. Full Frame. The chart below (in the cloudy bright column) shows the correct exposure to be ISO 400 F/11 @ 1/400s. I chose to stop the action by using a higher shutter speed, so I used the equivalent exposure of ISO 400 F/5.6 @ 1/1600 second. I also knew to expect less detail in the snow and white feathers, because there are no shadows to help define them.

What you shooting at there, Dodds?” echoed across the landscape as I set-up to photograph Snow Geese and Sandhill Cranes in New Mexico about a year ago. “What exposure you at Dodds?” was the question asked by the same gifted photographer just recently. I don’t want to embarrass anyone, so I won’t mention any names here. I truly do think that he is a gifted and talented photographer. He’s widely published and is also the first person to admit that he doesn't really know all the “techie” stuff.....and he was much closer to my exposure this year, than last. 

The single most important skill a photographer should have is a basic understanding of the fundamentals of photography. The most important tool, and the least understood aspect of photography is exposure theory. I learned photography with a totally manual camera and used slide film (seems like so long ago), so a basic understanding was necessary to make successful images.

 Q: Why bother when I can just keep things simple and take a picture, check the histogram and make any adjustments necessary? 

 A: Because having an intimate knowledge of exposure theory and your cameras functions and controls helps you grow and improve as a photographer, make better decisions and better images as a result.

In it’s simplest form, the Sunny 16 rule (or Sunny F/16 rule) states: On a bright, sunny day, the correct exposure for any middle tone subject is F/16 at the shutter speed nearest to the reciprocal of the film speed. For example:

ISO 100 = 1/100 second @ F/16

ISO 200 = 1/200 second @ F/16

ISO 400 = 1/400 second @ F/16

ISO 800 = 1/800 second @ F/16

Now we have established the correct exposure, it’s time to decide if we need more depth of field or shutter speed. Each step up, or down, of one variable represents a doubling, or halving, of any other variable. If you need more shutter speed than 1/100 second @ F/16 (ISO 100), then an equivalent exposure would be ISO 100 1/1600 second @ F/4.


This chart illustrates the equivalent exposures for ISO 100 and 200. Each setting above will allow the same amount of light to fall on your digital cameras sensor, or film cameras film. The exposure is the same, with the only difference being either your shutter speed (to freeze or blur action) or the depth of field (very narrow to blur the background, or very large to capture an entire grand landscape sharp).

But wait! It got cloudy. Now what? The Sunny F/16 rule is actually the correct ambient exposure for an average subject under bright sunny conditions. If the sun goes behind a cloud, then the light falling onto your subject is decreased and you must make an adjustment to your basic exposure settings. Here are some aperture settings for some different daylight situations:


This is intended as a starting point, so there are exceptions. Backlight or sidelight both require adjustments to reach the correct exposure. It’s a good idea to expose to the right with your digital camera; 50% of the recorded data is recorded on the right fifth (or 20%) of your digital cameras histogram. With very light subjects in very bright conditions, I routinely subtract light so as not to clip the highlights. With very dark or black subjects, I tend to add light to maximize the recorded detail. Notice the technicals for the Snowy Owl in my previous post; ISO 200 F9 1/1600 second = ISO 200 F22 1/1250 second (or Sunny F/16 rule for light sand or snow) minus 1/3 stop to preserve all of the details in the whites without clipping (or loosing) any data.

Sounds complicated, but if you spend some time digesting and thinking about everything here; you'll be able to get that once in a lifetime shot accurately and consistently with confidence. Not to mention how much you will impress the boys (or girls) when you are all standing around waiting for the shot or talking shop.

If you own an iPhone or iPod touch, there's a great application available for $1.99 called Exposure Calc. I just found it while writing this blog entry and think it is a great learning aid and pocket reference.

If you don't get it, and need to take a test shot, check the histogram, make adjustments, take another test shot; that's okay too, as long as you're having fun and making the odd good image to keep you interested.

Comments welcome & appreciated.